Firmware download
Download the latest software/firmware pack. Or any of previous versions if you have some preferences. It contains all files needed to setup hardware and change settings of it. Unpack it to the place where you will be running it.
Firmware flashing
Just follow firmware flashing process. Use HEX found in ffbeast-hex folder.
Settings quick start
When firmware flashing is done, reboot controller and run ffbeast-hardware-settings-ui.exe app sitting in ffbeast-ui folder.

Device mode
By default device boots as generic device which could be switched to different device mode. To use it as the FFB Wheel go to License tab, select Wheel and activate device. Now device will be in the FFB Wheel mode each time you reboot it.
You can activate wheel without a key! Just leave Serial Key field “as is” and press Activate.
Standard version if fully functional and have all essential functionality needed to build the wheel.
Extended version of software is available as reward for project donators.
It gives possibility to change some additional non critical settings, and possibility to connect buttons/axis directly to ODrive.
Hardware setup
As the next step you need to input required hardware values: Encoder CPR and Pole pairs. Consult datasheets for your components to found those values.
In case you follow reference assembly and use MT6701 encoder put 4096 into Encoder CPR
In case yof using howerboard motor put 15 into Pole pairs
Center position setup
By default when performing start calibration sequence motor is pulled to the closest magnetic pole position and consider this position as the center. You can change center position manipulating Calibration start angle.
- Make sure Enable force checkbox is UNCHECKED
- Make sure Calibration set as NONE.
- Overcome force of magnetic pole and put your wheel into “locking” position closest to the center.
- Manipulate Calibration start angle so wheel moved to the center position precisely.
This position will be saved as the center in future.
Activate force
When essential settings are set wheel ready to be activated
- Check Enable force checkbox.
- Select Calibration mode Start as the center.
- Save settings to the controller.
- And as final step Reboot device.
Output setup
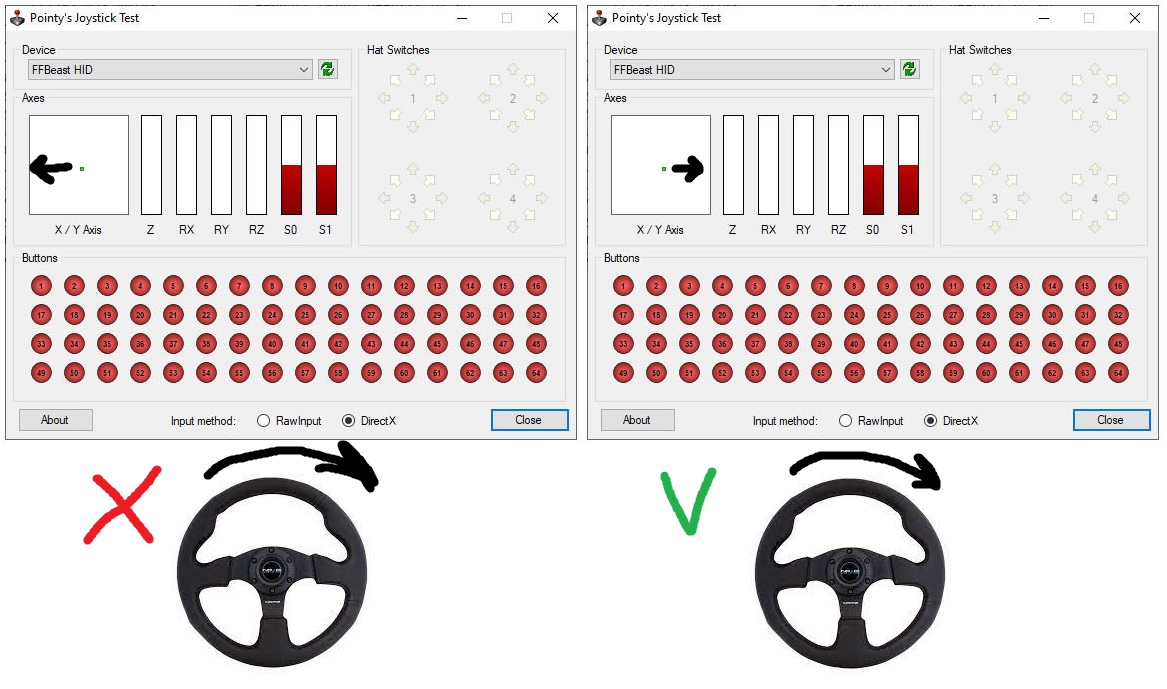
To make life easier, direction of joystick input should follow direction of the wheel rotation. JoyTester will help us do the job. Check if marker in joy viewer goes to the same direction where wheel rotates. If it goes in opposite direction - check Invert joystick output option and Save settings to controller.
Force direction
As the next step wee need to setup the wheel so forces work in correct direction. You can use ForceTest program to check the forces. Turn on Spring center effect and check if force pulls the wheel to the center. If force pulls wheel off center - check Invert force output option and Save settings to controller.

Personalization
All remaining settings could be set to your likings. Set desired Motion range, Dampening, and Power limit.
Braking limit setup
The last point in settings is braking limit. Setup of it requires a bit of trial and errors. During the quick rotations motor works as a generator. It produces electric energy and thus increases voltage in power line. It can cause PSU to go into overvoltage protection mode and switch off. To negate this effect, we connect a braking resistor to the ODrive in order to dissipate part of energy through it. How much - is determined by Braking limit setting. What is correct value? Depends on your motor and PSU! The best approach is to start from smaller value(5-10) and try to play. If during quick rotations left-right PSU keep working - it’s done. If no - increase it by 5-10 percents and repeat.
Enjoy!
That’s all. You’ve gone through all needed settings and your DIY Wheel is ready to go! If you like the journey - feel free to donate on further project development. Your thanks will be much appreciated :)