Skip to main content Link Menu Expand (external link) Document Search Copy Copied

Intro

Technical documentation for DIY build and firmware are available for purchase. For details contact me by email or in Discord.

You will receive purchased package via email, sent to the address provided during checkout.

In case you do not receive it within 24 hours, please reach out to me via personal message!

Check instruction where to get Device ID for firmware license!

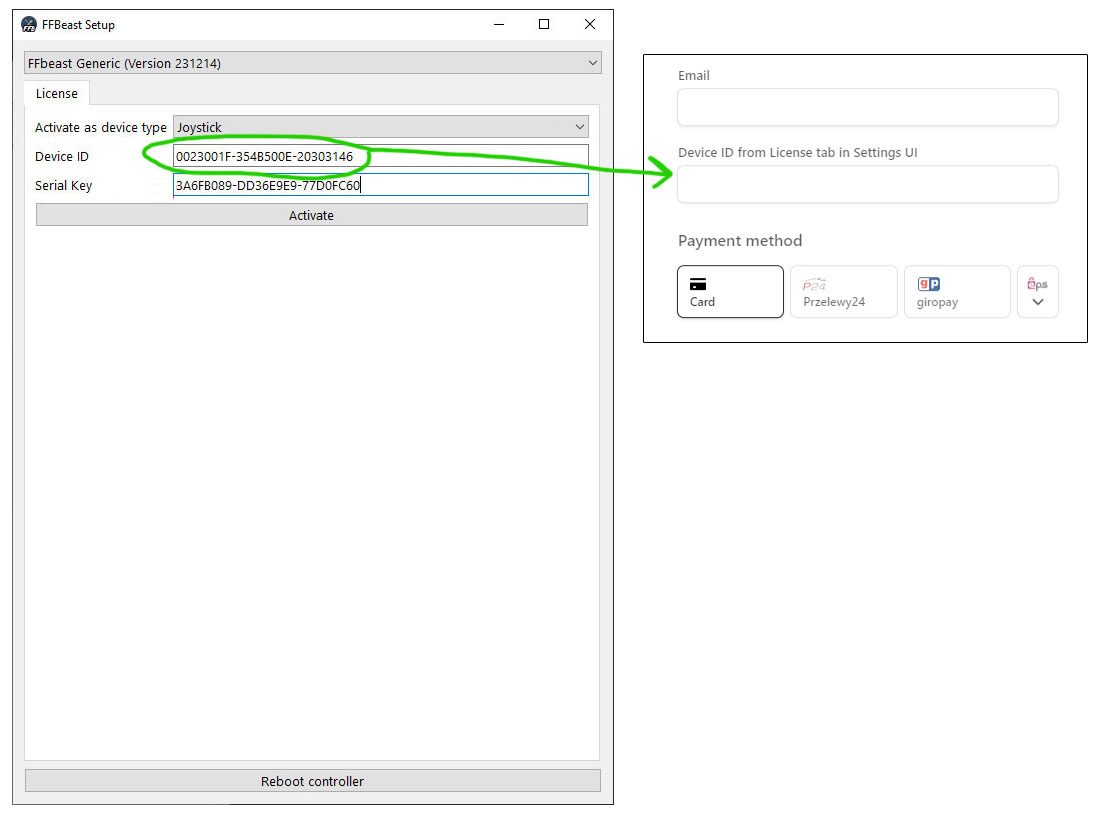
If you plan to build and use it for other purposes then personal - contact me and we will find a solution!

Project preview

BOM

Electronics

Part name Quantity Comment
ODrive/ODESC 1 Dual axis version needed
Encoder (AMT10E2) 2 AMT10E2 is highly recommended!
Motor 2  

Alu extrusions

Part name Length Quantity
20x20 250 4

Sheet metal parts

Part name Quantity Material Comment
enclosure_back_side_panel 1 alu - 3mm  
enclosure_bottom_plate 1 alu - 4mm could be other material and thickness
enclosure_connector_side_panel_odrive 1 alu - 3mm  
enclosure_cover_bracket 4 alu - 3mm to hold dust cover
enclosure_motor_mount 2 alu - 3mm  
enclosure_motor_side_panel 2 alu - 3mm  
enclosure_top_plate 1 alu - 3mm  
square_bearing_block 9 alu - 2mm 8 for enclosure + 1 for gimbal
gimbal_arm_bearing_block 1 steel - 5mm  
gimbal_arm_leg 2 steel - 5mm  
gimbal_arm_stick_connector 2 steel - 5mm  
gimbal_core_center 1 steel - 5mm  
gimbal_frame_core 4 steel - 5mm  
gimbal_core_screw_aligner 3 steel - 3mm  
gimbal_frame_side 4 steel - 5mm  
gimbal_pulley_spacer 2 steel - 6mm  
round_bearing_block 4 steel - 2mm alu will be ok as well

Build specific sheet metal parts

Encoder mounting possible in two variants: inside the enclosure and on front of the motor. Depending on it slight variation exists in BOM for those builds. You need to select only one variant from those options!

Encoder inside of enclosure sheet metal parts

Part name Quantity Material Comment
encoder_internal_drill_pattern 1 steel - 3mm Optional to help drill motor for encoder mounting
encoder_internal_plate 2 alu - 3mm  

Encoder on motor front surface sheet metal parts

Part name Quantity Material Comment
encoder_external_drill_pattern 1 steel - 3mm Optional to help drill motor for encoder mounting
encoder_external_plate_Xholes 2 alu - 2mm X - depending on face of the motor: 5 or 6
encoder_external_top_Xholes 2 alu - 1mm X - depending on face of the motor: 5 or 6

Bearings

Part name Quantity Comment
608 (8x22x7) 9 RS and ZZ version will be ok

Reducer

Part name Quantity Comment
HTD5M 60T pulley 2 Must be exactly 20mm width and 8mm bore
HTD5M 20T pulley 2 20-25 mm with 16mm bore
HTD5M-425 belt 2 15-16mm width in case pulleys have flanges, up to 20mm if pulley have full width teeth

Common Screws/Nuts

Part name Quantity Comment
M8x30 tube coupling nut (ART.9290) 2  
M8x25 (ISO 7380) 3  
M8x20 (ISO 7380) 2  
M8x50 (ISO 7380) 4 Could be other head type
M8 thin (ISO 4035) 9  
M8 (DIN 557 or DIN 934) 7 Could interchange each other
M6x30 tube coupling nut (ART.9290) 2  
M6x20 tube coupling nut (ART.9290) 2  
M6x10 (ISO 7380) 20 Could be other head type
M6x16 (ISO 7380) 4 Could be other head type
M6x35 (DIN 7991 or ISO 10642) 8  
M6 (DIN 557 or DIN 934) 16 Could interchange each other
M6 thin (ISO 4035) 8  
M5x8 (DIN 912 or ISO 7380) 20  
M5x10 (DIN 912 or ISO 7380) 8  
M5x12 (DIN 7991 or ISO 10642) 4  
M5 T-Nut 24 Standard nut for slotted alu profiles
M4x10 (DIN 912 or ISO 7380) 44  
M4 (DIN 557 or DIN 934) 44 Could interchange each other
M3x8 (DIN 912 or ISO 7380) 4  
M3 (DIN 934) 4  

Build specific Screws/Nuts

Encoder mounting possible in two variants: inside the enclosure and on front of the motor. Depending on it slight variation exists in BOM for those builds. You need to select only one variant from those options!

Encoder inside of enclosure Screws/Nuts

Part name Quantity Comment
M4x10 (DIN 912 or ISO 7380) 16  
M4x30 standoff 8  

Encoder on motor front surface Screws/Nuts

Part name Quantity Comment
M3x6 (DIN 912 or ISO 7380) 5(6) value in () is for 6 rays motor front face
M3x12 (DIN 912 or ISO 7380) 5(6) value in () is for 6 rays motor front face
M3x10 standoff 10(12) value in () is for 6 rays motor front face

Stick connectors

There are two options available. Choose one for extender you will be using. Both parts need to be made from metal

If you do not have local shop that can produce such part, adapters could be ordered from JLCPCB CNC service. Them ask you for CAD fila and image with threads. Those files are available in CAD package.

VKB adapter

It is intended to be used with standard VKB extender. You will need to purchase extender from official VKB store if you do not have one. This part replaces lower part from original extender.

Thrustmaster style adapter

This adapter has standard M36x2 thread and is intended to be used with all kinds of extenders compatible with Thrustmaster(and VPC).

Wiring diagram

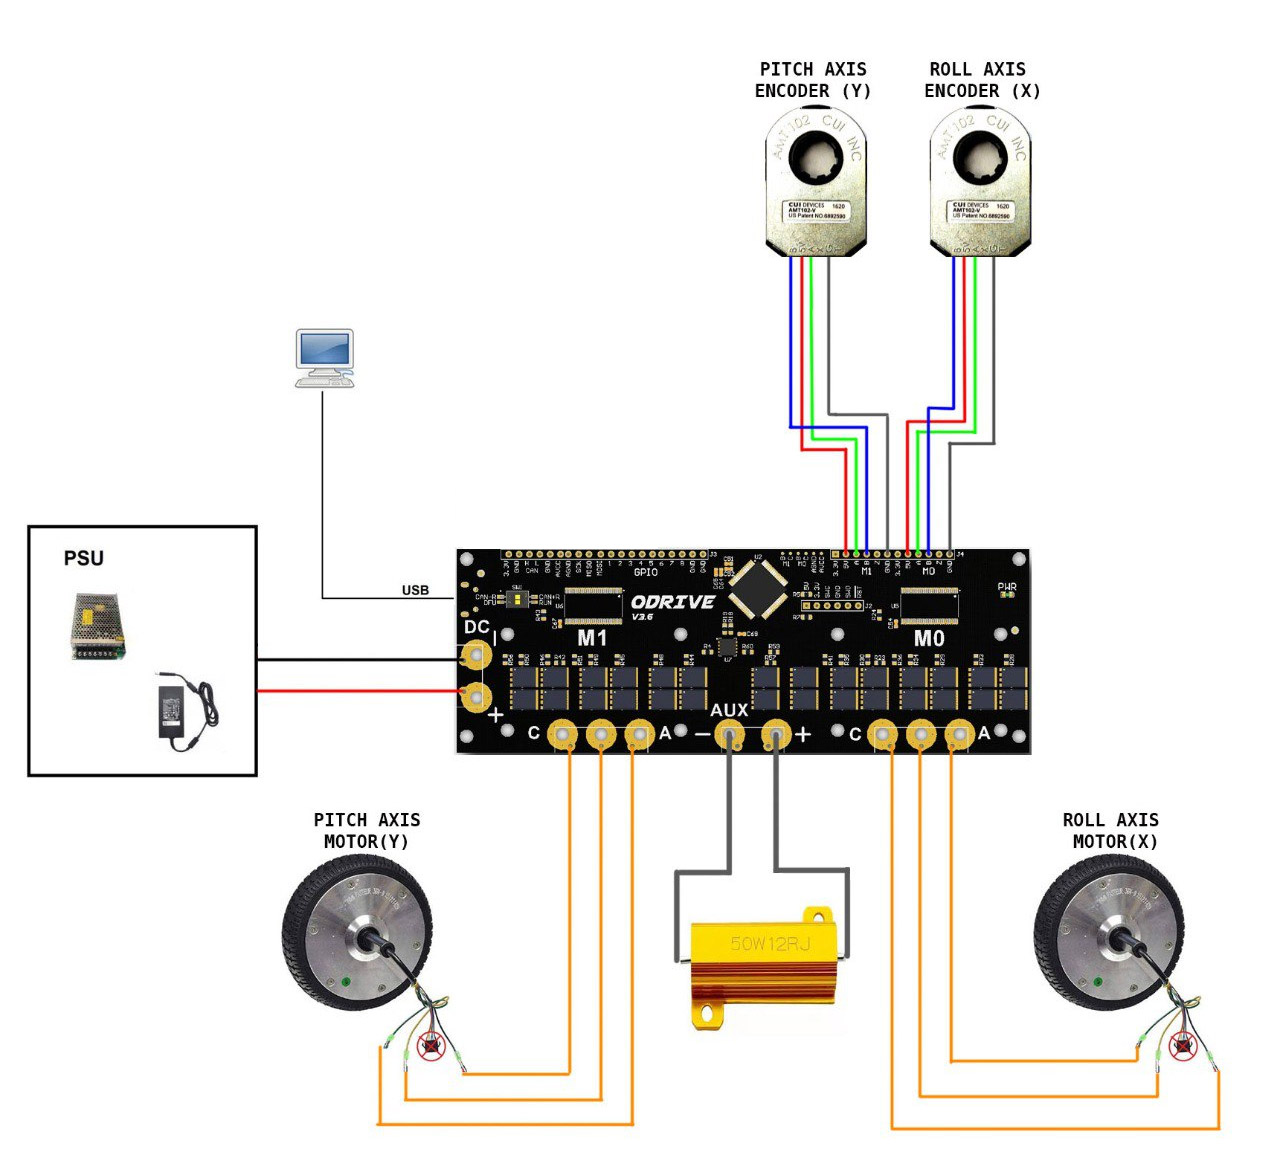
Keep order of encoders and motors!

Both axis need to be connected as on the picture! Pitch to M1 and Roll to M0

Software

Check download section, firmware flashing section, and how to use settings app.

Building instructions

Will be there soon!

For now you can follow excellent Discord topic where one of enthusiasts keep track of his real world experience with building it.